
Table of Contents
Internet mapping, imagery and locations
If you have any questions comments or suggestions about any of this material please don't hesitate to email me at:
Email Address: geoffreykgreig@gmail.com
A recording of a Webinar that presented all this material can be viewed here:
Sorry that link no longer works
However the program that plays the recording has, in some instances, reduced the time required to watch some external YouTube videos. To overcome this problem you may have to pause the Webinar playback until the YouTube video is complete.
If you are watching a Blackboard Collaborate recording of this presentation and one slide appears to stay on the screen whilst I am talking about something else then it is possible that is is caused by a problem with Blackboard Collaborate playback involving “Application Sharing”. To overcome that problem click Here
I also did a Live online training session on a lot of this material that can be view here:
https://www.youtube.com/watch?v=-WZoofXsPWc
Because I wish to show moving graphic intensive demonstrations of mapping applications I have discovered I can not satisfactorily do so with the Blackboard program so I have created a number of videos using Google Hangout on Air. Here is a link to a video that shows you how to watch these videos (They are on YouTube) and then get back to the Blackboard Program https://www.youtube.com/watch?v=pMxJZNKwpzE

There is much more to maps on the Internet than Google maps and there's a lot more you can do with Google maps and other Internet maps than you may realize.
During this session you can learn how to:
- Find many different types of maps on the Internet
- Use internet maps without the Internet
- What you can do with maps
- Use Imagery maps
- Make use of maps on mobile devices
- Remotely show others exactly where you are, have been or are going

Introductory Questions & Comments
- Who has never used Internet Maps?
- What do you use internet maps for?
- How do you think internet maps work?
- Do we have any Cartographers Drafters or Surveyors in today's session
Everything I know about what I will be presenting today has been self learnt. I have no qualifications in this area. 17 years ago I purchased a GPS and so got involved in digital mapping. I have seen some dramatic changes in mapping because of advances in technology. The movement of maps from paper to digital and the internet have revolutionize mapping.
Find many different types of maps on the Internet
How? Use Google. Enter “Map” into Google and you may get 1,380,000,000 results
You can reduce the results by entering “Map of” followed by the location you are interested in.
So what are: ![]() Google Maps,
Google Maps, ![]() Yahoo Maps,
Yahoo Maps, ![]() MapQuest Maps,
MapQuest Maps,![]() Bing Maps,
Bing Maps,![]() Streetmap,
Streetmap,![]() OpenStreetMap, Etc.
OpenStreetMap, Etc.
They are basically different Brands, from different vendors who may or may not own the maps.
Yes even though it may not cost you to view these maps they are owned by, usually organisations, that get paid when you view them. In other words internet maps make money. But their are exceptions. eg. Open street maps.
The organisations that show the maps , like, Google, Yahoo and Microsoft, usually do not own the maps. Note the copyright message  that may appear with the map. So their are very likely restrictions on how you can use these maps, especially if you use them for commercial gain.
The many different types of maps
Political, Physical, Topographic, Climate, Economic or Resource, Road, Mud, ……..
Regardless all are displayed on the internet as Graphic images and their are many graphic formats that have relevant advantages and disadvantages
Two broad categories of graphic images are Raster and Vector. Raster are pictures made up of pixels. Vector Graphics are numbers representing positions of shapes that are drawn via a graphic engine (CAD Computer Aided Drawing) or GIS (Geographic Information Systems)

Practically all the maps you view on the internet are Raster images
Using the maps you have found
This depends on the web site you found it on.
Eg If it is just a graphic on a web site all you may be able to do is look at it, print it or save it. NOTE: any image on the internet can be saved by right clicking on it and selecting save as, or using Windows Snipping Tool, or by capturing the entire screen with the PRTSCN key and pasting it into a graphic program like Paint.
Demo of Google Maps
https://www.google.com.au/maps
Which Version: Original  or New
  . Switching between the two: From New click on the icon ? (Help) icon, right bottom, then click on Return to Classic Google Maps.
New has more functions, eg see older street view images
The URL's for each are Classic: www.google.com/maps New: www.google.com/maps/preview
What you can do Google Maps(For the NEW version)
Click here to see the video demonstration https://www.youtube.com/watch?v=Wgnz_ds9afg (12 minutes 40 Seconds)
- - To find out Google, Google Maps Help (New Version) Or Click on the help Icon, Question Mark icon bottom right
- - Zoom in and Out: In Double Click, or Use the zoom slider, or mouse scroll wheel
- - Find a specific Location: Type it in to the Google Search Rectangle
- - Switch between map and satellite modes: Click on Satellite or Map (bottom Left)
- - See Traffic, Traffic, Transit,Bicycle or Terrain, point at the search box and a menu will appear below it, Select the appropriate item.
- - Show your current Location: Click the button icon above the + and - icons, bottom right
- - Find the coordinates of a position: Right Click and select “What's here?”, coordinates are show below the search bar
- - See more information about an item on the map: Click on it
- - Get directions:Point at search bar, click Directions Button
- - Set up you own maps, locations and the like: Click on the wheel Icon (bottom right) Select My Places (A Google Account is required to use these functions)
- - Print the map you are viewing: Whilst holding down the CTRL key press the P key
- - Create a link to the current view map: In the bottom right, click the gear icon and select “Share and embed map” in
- - See photo of the area:Click on the Photos Icon (bottom right) or drag the peg man over the map and release him on a blue dot
- - See maps of inside buildings (usually shopping centers): Zoom in to them, Click on number (bottom right) to select the floor level
- - See a Street View: Drag the Peg man (Little yellow icon of a person at the bottom right) on to the map.
Within Google Street View:
- Return to the map: Click back to map, (above bottom left image)
- Show street view full screen: This can not be done as well as in the old version. Closest to it is to switch the browser to full screen with the F11 key
- Zoom the image in or out: Click on the + or - icon (Bottom Right)
- Move the image: Drag with the mouse or click on the appropriate part rotate view compass icon (towards bottom right)
- Jump to the next taken image: Click on the appropriate < > icons, or the white semi transparent shadow
- See older versions of the same street view: Click below the name of the view (top left)
- See inside (some) buildings (Business View): Drag the Peg man over the map and release him where orange dots appear
What you can do Google Maps (For the original version)
Click here to see the video of the Demonstration https://www.youtube.com/watch?v=XndqcbnW0k0 (8 Minutes 44 Seconds)
- To find out Google, Google Maps Help (Original Version)
- Zoom in and Out: In Double Click, Out Right Click and Select Zoom Out, or Use the zoom slider, or mouse scroll wheel
- Move to a different location: Drag the map, in combination with zooming
- Hide AND show the side panel: Click on the side panel triangle
- Find a specific Location: Type it in to the Google Search Rectangle
- Switch between map and satellite modes: Click on Satellite or Map (top right)
- See Traffic, Photos, Weather, Terrain, Bicycle, 45 Degree, Labels or select a language: Click Traffic and the the appropriate item
- Show your current Location: Click to button on top of the Zoom Slider
- See more information about an item on the map: Click on it
- Get Directions: click on Get Directions Button(Only shown on Side Panel)
- Set up you own maps, locations and the like: Click on the My Places button (Only shown on Side Panel)(A Google Account is required to use these functions)
- Print the map you are viewing:Click on the printer icon. (Only shown on Side Panel)
- Create a link to the current view map: Click on the Link Icon. (Only shown on Side Panel)
- See a Street View: Drag the Peg man (Little yellow icon of a person) on to the map.
- Save the current map so that you can use it later without being on the internet: Type ok maps in to the search rectangle (only works in the Mobile versions)
Within Google Street View:
- Return to the map: Click on the X near the top right corner
- See the screen split to 1/2 map and 1/2 Street view: Click on up pointing arrow on small map in the bottom right
- Show only a small map in the bottom right from the 1/2 map: click the down pointing arrow on the bottom right
- Remove the small map in the bottom right. Click the down pointing arrow on the bottom right
- Show street view full screen: click on the four arrow icon near the top right.
- Move the image: Drag with the mouse or click on the appropriate part of the movement icon (top left)
- Jump to the next taken image: Click on the appropriate < > ^ icons on the image on the white semi transparent shadow
- Zoom the image in or out: Click on the + or - icon (top left)
Demo of Google Earth

What is it: Allows you to see a 3 dimensional view of the Earth, the Moon, Mars, under the oceans and parts of the Universe (Sky view)
Can be used 3 ways: Desktop, Web and Mobile
The Web version is from Google Maps, Desktop version requires it to be downloaded and installed and the Mobile version is via an App: Google play store or Apple ITunes.
The Desktop version has the most features and you can save information (not maps) via Kmz or Kml files: ie Tracks, Waypoints and the like.
The Desktop version comes in 3 varieties Free, Pro $399, or Enterprise $?. The paid for versions DO NOT have any better imagery. See: http://www.googiesle.com/earth/explore/products/desktop.html
Click here to see the video of the Demonstration https://www.youtube.com/watch?v=kKLVbk7B1G0 (15 Minutes 55 Seconds)
- - It has Menus that include a help that DOES provide help
- - Switch on and off the Atmosphere: View, Atmosphere
- - Switch on and off shadows: View, Sun. Then move in time with the Sun slide bar
- - Switch on and off Layers: Tick or un-tick them. Layers can have sub-layers. Expand or contract the layer by clicking on the small triangle to the left of the layer description
- - Add new Layers: Click on Earth Gallery
- - See Historical Imagery: View Historical Imagery
- - Change the resolution of the imagery: View,View Size
- - Rotate the Earth: Use the control or drag or CTRL + left or right arrow keys
- - Zoom in or out: Use the control or + or - or double click (zoom in) or Right click and Mouse up and down, or Mouse scroll wheel.
- - See the Universe behind the Earth: Zoom out to a small planet and then drag
- - Tilt the Planet (view): Use the top control or CTRL + up or down arrow keys
- - View 3D building and Trees: Click on 3D Building in Layers (Expand or contract the layer by clicking on the small triangle to the left of the layer description)
- - Show Road Positions and Names: Click on Roads in Layers
- - Fly to a particular location: Enter the name of the location in the search, click on the result.
- - Get Directions: Click on Get Directions at the the top left of the panel enter 2 locations and click on get directions
- - Add something to the map: Click on the Add Menu.
- - Save what you have added or found. File, Save to My Places. Or within My Places, Select a item and Right Click, click on Save Place As
- - Go on a virtual Tour. Zoom to the location you are interested in and Click on Tour Guide (bottom left of map)
- - Measure Distances: Tools Ruler
- - Connect to a GPS to show live positioning: Tools GPS
- - Fly a plane (simulated) Tools Enter, Flight Simulator
- - See Street View: Point to upper right of map until Peg Man appears (Yellow icon of person) Drag him to the area your wish to see.
- - Go to the Moon, Mars or somewhere else in the Universe: View, Explore.
- - Set it up the way you wish to use it: Tools Options
There is MUCH MUCH more to Google Earth. Here is a link to some video tutorial on using it: https://www.youtube.com/playlist?list=PLC5E193AC559FCBF3
Use internet maps without the Internet
All the previous ways using of maps require a internet connection. Sometimes you may not have a internet connection, but there are ways to use internet maps without an internet connection provide you have planned for doing so
There are multiple way of doing so.
Basically all involve saving the map data to your computer or devise.
Demonstration of Using Google Maps without an internet connection (Only works on Mobile Devises)

Click here to see the video demonstration https://www.youtube.com/watch?v=Xqi_Mzgcogk (1 Minute 29 Seconds)
- - Whilst you have an internet connection use Google Maps to zoom in to the area you are interested in
- - In the Search Box enter “Ok maps” without the quotes
- - You should get some form of confirmation that the maps have been saved
You can now use Google maps in the area you selected without having an internet connection
You can not select large areas and some areas can not be saved this way. Most likely because of copyright restrictions
Demonstration of saving the screen
If a map can be shown on the screen it can be saved for later displaying. Eg of a map to use: http://www.snowhq.com/content/plugins/snowreports/skiareamaps/MtBawBawTrailMap.jpg
Using the PRTSCN button
- - Use the internet to display a map.
- - Press the PRTSCN key or if only wish to capture the current window whilst holding down the ALT key press the PRTSNC key
- - Open any graphics program such as Microsoft Paint. Use the Paste function. The image should be presented.
- - Use the save function to save the image
Using Snipping Tool (comes with windows 7 and 8)
- - Start Snipping Tool (If you can not find it enter “snipping tool” in the search box in the start menu in Windows 7 or just type “snipping tool” when at the start screen of Windows 8
- - Drag over the item you wish capture
- - Use the save function to save the image
Many maps are bigger than can fit on a computer screen and so require you to scroll to see all of the map. In this situation if the screen is saved you only get to save a portion of the map. There are graphic programs that allow you “Stitch” multiple images together, however these can be very time consuming to use. However their are program that allow you to automatically save maps that are quite large.
Demonstration Of Mobile Atlas Creator

As most internet maps show the image on your browser by assembling a series of tiles (small graphic images usually thumbnail size) Mobile Atlas Creator allows you to select the area of map you wish to save and downloads tiles from the map server and puts the tiles together to make one image file that can them be used in a variety of applications.
Click here to see the Video Demonstration https://www.youtube.com/watch?v=dnMHKsJcVXg (5 Minutes, 0 seconds)
NOTE: CORRECTION: At 50 seconds from the beginning of the video I said you can zoom in with the mouse pointer, that is wrong, it is the mouse wheel
- - Zoom to the area you wish to obtain map for: Use the zoom bar
- - Move the map so you can see the area you are interested in: Use the arrow keys (there does not appear to be any other way to do this)
- - Select the Grid Zone on the map to see how big each tile is and how many tiles are involved: Use the Grid Zone Drop box
- - Select which Internet Map Server you wish to use: Click the blue arrow to the right of Map source so that it is pointing to the right, click the drop box on the next line and select the appropriate server
- - Select the Zoom levels you wish to save: Tick the appropriate zoom levels
- - Select the Atlas Content: In Atlas content click on the Add Button to add the selected area. Give the Atlas a name and select the required format (which program you will be using the map data in.
- - Create the Atlas: In the Saved profiles section click on Create Atlas
Demonstration of Oziexplorer (Make the images Useful)

Having only a map image on a computer is not as useful as having a map that shows a position using co-ordinates like Latitude and Longitude such that other items can be show on the map, like your current position (Via GPS), where you have been, (tracks) specific positions (waypoints and points)
Click here to see the video demonstration https://www.youtube.com/watch?v=CP7tYxy-OGE (5 Minutes 44 Seconds)
- - Make an image so that it can be used as a map: File Load and Calibrate Map Image, Select a map image file, Select the map Datum (how a flat map mathematically is represented on a curved earth), Select a Point tab, Click a point on the map, enter in the Co-ordinates, repeat for at least one other point, Click Save.
What you can do with maps
An incomplete list
- - Compare locations on different types of maps at different periods of time
- - When combined with a GPS plot your position on the map
- - See where you are as you move
- - Show a record of where you have been with precise accuracy and time
- - Precisely see where transport items such as Ships and Aircraft are and have been https://www.marinetraffic.com/en/ http://planefinder.net/
- - Load them on to portable devises such as Phones and Tablets
- - Look at the same data, eg recorded tracks or waypoints in different mapping programs eg Oziexplorer to Google Earth and back againher
- - Know where other people are for security purposes or even to avoid then
- - Record where you have been and how fast where moving for legal reasons. eg defense against speed cameras, evidence for insurance purposes, defense against identity fraud
- - To record a holiday trip
- - Reminisce on a holiday you have been on
- - Plan a holiday trip, see where you may want to go and may not want to go
- - To determine where digital photos where taken
- - Have fun
Use Imagery maps

Rather drawing maps digital photos can be used as maps, such as Satellite images and Aerial photos.
Google Earth is set of world wide satellite and Aerial photos
The Satellite view of Google maps are all images.
Business subscribe to very up to date aerial photos. eg. http://nearmap.com/au
Make use of maps on mobile devices
Most modern mobile devises have a built in GPS such that is possible to see exactly where you are at any time the devise is on and you have a clear view of the sky, so the GPS can receive data from the GPS Satellites.
A common App installed on mobile devices is Google maps.
Demonstration of Google Maps on an Android phone

Click here to see the Demonstration https://www.youtube.com/watch?v=kunLEqqwX9I (10 Minutes 45 Seconds)
- - Show current location: Touch pointer bottom right
- - Zoom in and out: Spread or contract 2 fingers
- - Move map to a different position: swipe in the direction you wish to move
- - Find a particular location: Touch the search box and type it in or touch the then appearing Microphone and say the location
- - Get Driving Directions: Touch right pointing arrow in search box, enter destination, Choose method, Car Public Transport, Push Bike or walk, Set options, Avoid, Highways, Tolls, Ferries.
- - From within shown directions: Swipe to see alternative routes, Touch a route to see route on map, Slide up Route to see turn by turn directions, Touch Start to get spoken directions (Navigation)
- -From within Navigation: Zoom and pan map as in normal maps, Touch compass to switch between map ahead and map north mode, Swipe left or right on next turn point to see next or previous turn point, touch menu to see options of: Route preview, Step by Step list, Mute voice guidance,and Show satellite, Touch resume to resume navigation, Touch bottom of screen to switch between, Distance to go, Time to go and Expected time of Arrival, Touch X at bottom left to cancel Navigation
- - To find information about a place on the map: Long touch, Drag up or touch the name of the location: Touch route to get directions, touch save to save the location, touch share to share the location with someone else, touch the image (street view) to see a full screen street view
- - Within Street view: Zoom and Pan as in maps, Touch the top of the image to see the street name and then Touch the menu (three dots top right) to share the image or report a problem to Google, touch the arrows on the image to move to the next image in that direction, Touch the back button to exit Street View
- -To see the menu options: Touch the menu (3 bars at bottom left) or swipe from the left. From the Menu Switch on and off: Traffic, Public Transport, Bicycling, Satellite, Switch to Google Earth, Settings, Help, Send feedback (to Google) and tricks and tips
- -To save the current location to use when not connected to the internet: Enter “ok maps”, without the quotes into the search box.
Demonstration of Google My Tracks on an Android Phone

http://www.google.com/mobile/mytracks/
Google maps does not record where you have been. To do so you can use another free Google Product. Google My Tracks.
Click here to see the video demonstration https://www.youtube.com/watch?v=zF31Qu5BCv0 (4 Minutes 40 Seconds)
- - To start recording a track: Touch the Record button
- - To stop recording: Touch the Stop Button
- - To see a Graph of your speed and Elevation: Touch Chart
- - To see statistics of your track: Touch Stats
- - To go back to the map from other functions: Touch Map
- - To see where you are on the map: Touch the current location Icon (top right)
- - To Zoom the map in and out: Spread or bring together two fingers or touch the + or - Icon
- - To move the map: Swipe the the direction you wish to move
- - To save a track: Touch stop Button, fill in the details and then touch save
- - To use additional functions: Touch Menu
- - To Allow others to see your track or markers: Touch Menu, Export, Google Maps, Touch Export, Touch Share track URL, Select the Share method, Touch the Send Icon
NOTE: It is possible to have multiple apps accessing the GPS function on a Android devise at the same time. In earlier model Iphones and Ipads this was not possible. I understand is possible in later models
Demonstration of Oziexplorer for Android on a Android Phone


http://www.oziexplorer.com/ Oziexplorer Android on the left menu
Oziexplorer for Android can show most of the same maps as the PC version and so provide a variety of maps and record track at the same time. The layout of the screens is completely user configurable by the end user (soft software) and up to 20 screens can be created per configuration file with unlimited configuration files. Configuration files can be swapped when using the App. Hence the way it is operated can be different depending on the way the screens have been designed
Click here to watch the demonstration video https://www.youtube.com/watch?v=M9cBrgwdqx0 (9 Minutes 55 seconds)
- - Switch GPS tracking on and off: Touch the GPS Tracking Icon
- - Move the map: Swipe the map, only works if GPS tracking is off, then only to the extent of the map
- - Zoom in and Out: Move two fingers together or apart or click on + or - controls
- - See the Main Toolbar: Touch main toolbar icon.
- - Switch to a different screen page : From main toolbar touch Page Menu and touch the page you wish to see, or swipe left or right at bottom of screen
- - Load a map of more or less detail: Touch next more detail map or next less detail icons
- - Load a specific map: Touch menu, Load Map, touch the specific map
- - Create a waypoint at the current position: Touch create waypoint icon, or touch menu, Create Waypoint
- - Work with waypoints, routes, tracks, maps or navigation: Touch menu, Main menu, Operation, touch appropriate item
- - Save tracks: Done automatically with a separate file created for each day, provided Log track to file is ticked in track configuration (Menu, Main Menu, Configuration, Tracks)
- - Load previous recorded tracks or tracks from other sources: Menu, Main Menu, Operation, Tracks, Load User track file, touch the file.
Far to many features to show in the time we have available.
Remotely show others exactly where you are, have been or are going
Their are many ways of doing this depending on the the devises and Apps you and the other people have. Here are just a few.
- - Capture your current devices screen and email it
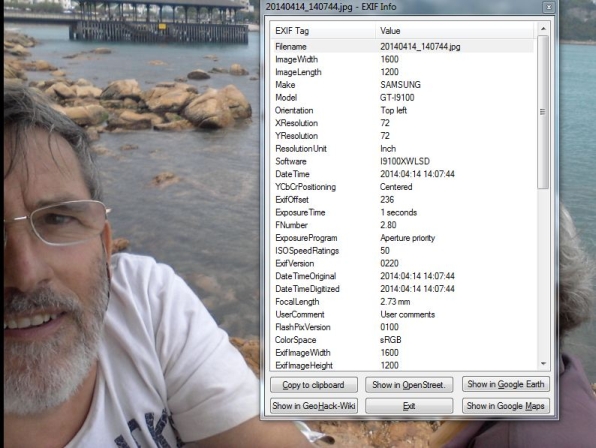
- - Take a photo with a Phone or Pad or GPS enabled camera. The GPS position is stored in the photos EXIF data and programs like Irfanview can show the position on Google Maps or Google Earth
- - In Classic Google Maps click on a location and then right click and select “Whats Here” The Coordinates will be displayed in the Search Box, Select them and copy and paste then in an email. If the recipient pastes them in to the search box and search Google maps will show the position.
- - In the new Google maps when you click on a location the Coordinates are displayed below the address on the location in a dialog at the top left. This also can be pasted into a email. Again the recipient can paste it into the search box of the new Google maps.
- - Any co-ordinates pasted into a Google search will show the position on a map
- - In Google Earth (Destop Version): Click on the the folder you wish to use then click on a Position, Add Menu, Place Mark, enter any details, Click Ok. Unlimited multiple Places can be stored this way. Then right click on the folder and select Save Place As. The resulting file can be emailed to anyone who can then open it in Google Earth. A similar thing can be done with Paths(tracks) and directions.
- - With Google My Tracks you can record tracks as your move that can be saved and optionally shared with others. The saving format is the same as used by Google Earth.
- - In Oziexplorer: Click the Waypoint icon on the tool bar. Click on the map where you want the waypoint set. Right Click on any waypoint you wish to name or set any details for. Repeat for as many waypoints you wish. From the files menu select Save, Save waypoints to file. The file(s) can be emailed and used by any that has Oziexplorer or via some conversions programs other mapping programs
- - In Google Maps (mobile version) Long press on a location, touch the location name a the bottom of the screen, Touch share and select the share method.
- - In Oziexplirer for Android: Menu Create waypoint. Use Nearest Waypoint list to select waypoint and touch Edit properties to name and set other waypoint properties. This can be done for multiple waypoints. From the Waypoints menu select Export All Waypoints. The resulting file(s) can then be emailed.
- - Google + is meant to be able to share your location (a replacement for Google Latitude) but I can not work out how to do so.
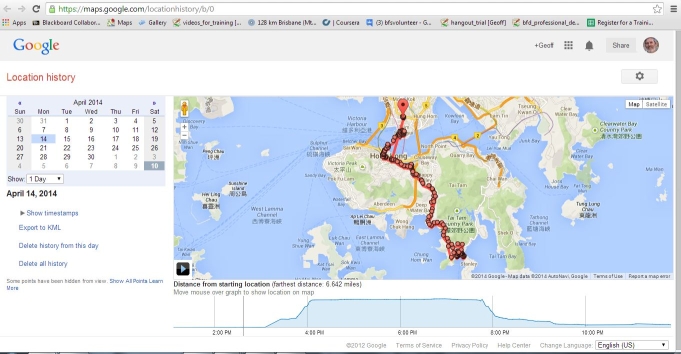
- - Google Location History: https://maps.google.com/locationhistory/b/0 allows you to know your own location history but does not allow you to share it unless you give someone else access to your Google account
- - There are many other apps that allow you to share your location.


NOTE: My Samsung Galley phone's GPS does not appear work when traveling over 200 KPH (like when flying) but my old cheap Huawei Ideos U8150-D and another Huawei Ideos I bought do.
Summary
During this session we discovered how to find many different types of maps on the Internet via a Google search, How to use internet maps both with and without the Internet, what you can do with maps, how to use imagery maps, make use of maps on mobile devices and remotely show others exactly where you are, have been or are going.
The web page for this presentation is here:
http://geoff.greig.net.au/docuwiki/doku.php?id=internet_mapping_imagery_and_locations
If you have any questions comments or suggestions about any of this material please don't hesitate to email me at:
Email Address: geoffreykgreig@gmail.com
You can save any parts of the Webinar by going to the the File menu within Blackboard Collaborate
A recording of the Webinar was made and should be at the top of this page.
Recording of previous Webinars can be found at the Adult Learning Australia (ALA) web site here: https://ala.asn.au/broadband-for-seniors/recorded-elluminate-session/
Review the videos at any time
You can review and uses any of the videos shown in this presentation at any time
Here is a summary of them:
- - What you can do Google Maps(For the NEW version) https://www.youtube.com/watch?v=Wgnz_ds9afg (12 minutes 40 Seconds)
- - What you can do Google Maps (For the original version) https://www.youtube.com/watch?v=XndqcbnW0k0 (8 Minutes 44 Seconds)
- - Demo of Google Earth https://www.youtube.com/watch?v=kKLVbk7B1G0 (15 Minutes 55 Seconds)
- - Demonstration Of Mobile Atlas Creator https://www.youtube.com/watch?v=dnMHKsJcVXg (5 Minutes, 0 seconds)
- - Demonstration of Oziexplorer (Make the images Useful) https://www.youtube.com/watch?v=CP7tYxy-OGE (5 Minutes 44 Seconds)
- - Demonstration of Google Maps on an Android phone https://www.youtube.com/watch?v=kunLEqqwX9I (10 Minutes 45 Seconds)
- - Demonstration of Google My Tracks on an Android Phone https://www.youtube.com/watch?v=zF31Qu5BCv0 (4 Minutes 40 Seconds)
- - Demonstration of Oziexplorer for Android on a Android Phone https://www.youtube.com/watch?v=M9cBrgwdqx0 (9 Minutes 55 seconds)
Total videos duration 01:14:52 ie 1 Hour 14 Minutes and 52 Seconds
Page Tools
